Quantcast
Channel: nutanix
Viewing all 26 articles
Browse latest View live

4.0 Feature: Cluster Health Framework

$
0
0
Nutanix cluster health is designed to detect and analyze Nutanix cluster related failures to bring more customer visibility to the issues by providing cause/impact and resolution. Nutanix cluster health utilizes plugins from NCC ( nutanix cluster check) utility.

NCC is developed by Nutanix Engineering from inputs provided by support engineers, customers, on-call engineers and solution architects. Nutanix Engineering productised their troubleshooting scripts into NCC. Nutanix Cluster health runs NCC plugins at various intervals and provides easy access to the results through UI.  Nutanix customer will be able troubleshoot or identify the issues with the cluster and will result in a faster resolution. This will provide uniform troubleshooting tools across different Hypervisors.

Nutanix cluster health can be accessed from Prism Element (URL: CVM's ip address).

Prism Element First Page - Cluster Health Access


Nutanix Prism Element has a cluster health walk-through which shows an example disk health troubleshooting.
 

Here is the list of cluster health checks 
List of Health Check

CVM:
  1. CPU Utilization/Load Average
  2. Disk - Metadata Usage (Inode)/HDD disk Usage (df) /HDD latency(sar/iostat) smartctl status/SSD latency.
  3. Memory committed ( /proc/meminfo)
  4. Network - CVM to CVM connectivity (external Vswitch), CVM to host (nutanixVswitch), Gateway config, subnet config ( verify nutanix HA network config)
  5. Time Drift - between CVM/Host
Host/Node:
  1. CPU utilization
  2. Memory swap rate
  3. Network - 10 Gbe connectivity(vswitch and vmknic) / Nic Error Rate/Receive and Packet loss (ethtool)
VM : ( Nutanix provides VM centric stats - http://nutanix.blogspot.com/2013/08/how-much-of-detail-can-you-get-about-vm.html)
  1. CPU utilization
  2. I/O latency (vdisk)
  3. Memory ( swap rate/usage)
  4. Network Rx/Tx packet loss. 
CLI options:


    nutanix@NTNX-13SM35300008-B-CVM:10.1.60.110:~$ ncli health-check ls |grep Name
        Name                      : I/O Latency
        Name                      : CPU Utilization
        Name                      : Disk Metadata Usage
        Name                      : Transmit Packet Loss
        Name                      : CVM to CVM Connectivity
        Name                      : Receive Packet Loss
        Name                      : CPU Utilization
        Name                      : CPU Utilization
        Name                      : Transmit Packet Loss
        Name                      : Memory Usage
        Name                      : Receive Packet Loss
        Name                      : HDD I/O Latency
        Name                      : Gateway Configuration
        Name                      : HDD S.M.A.R.T Health Status
        Name                      : Load Level
        Name                      : Memory Usage
        Name                      : CVM to Host Connectivity
        Name                      : 10 GbE Compliance
        Name                      : Time Drift
        Name                      : HDD Disk Usage
        Name                      : SSD I/O Latency
        Name                      : Memory Pressure
        Name                      : Memory Swap Rate
        Name                      : Subnet Configuration
        Name                      : Memory Swap Rate
        Name                      : Node Nic Error Rate High

    Configuration of Health Checks:


    1. Turn Check off
    2. Parameters for Critical/Warn Threshold (if applicable)
    3. Change the schedule.
    4. Edit option available from CLI as well . ncli health-check edit  (interval/enable/parameter-thresholds) 
    Cause/Impact and Resolution:

    Each health check provides
    1. Cause of the failure :  Example - disk running out of space
    2. Resolution: How to fix the issue -Example: add storage capacity or delete the data.
    3. Impact:  What will be the user/cluster impact ?
     History of the check and list of entities checked ( different disks/ list of CVMs)

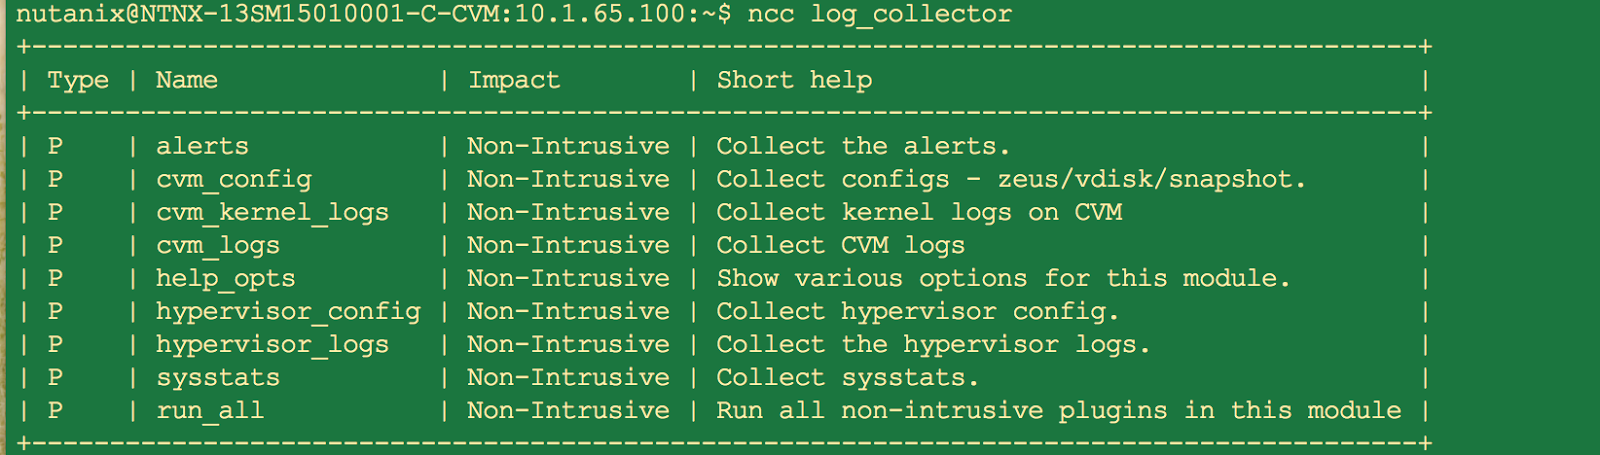
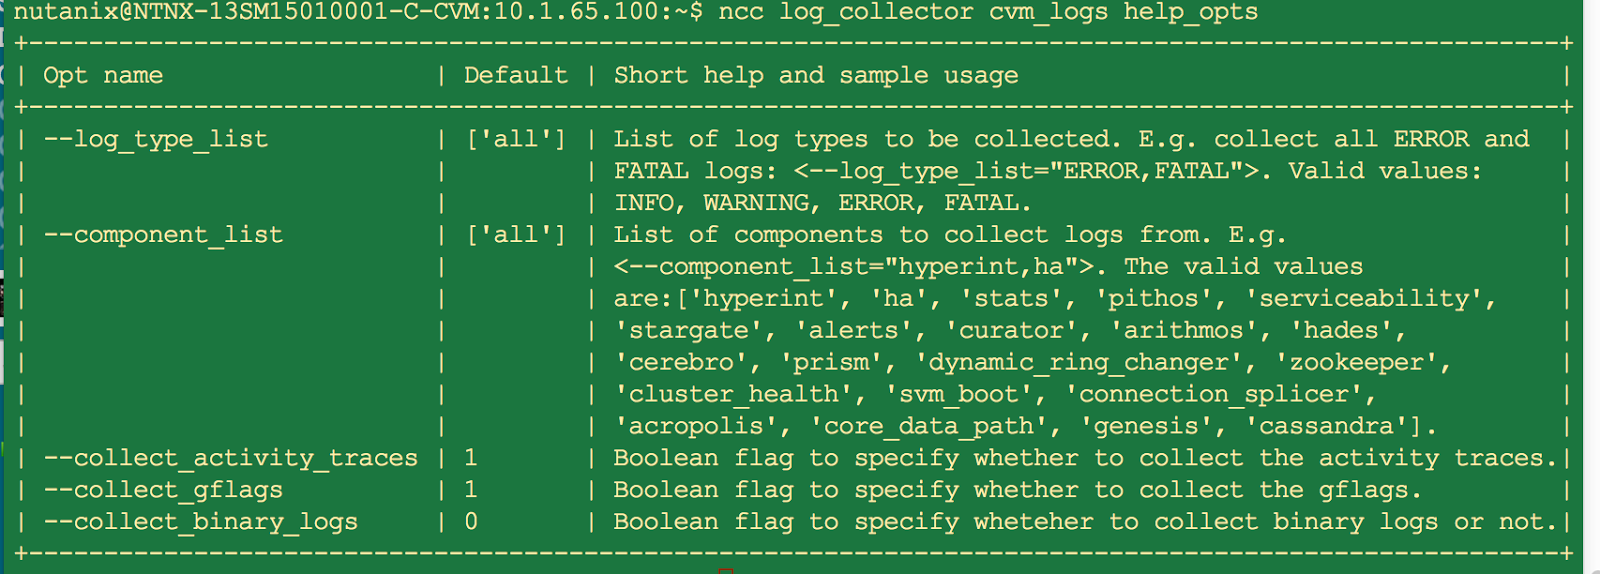
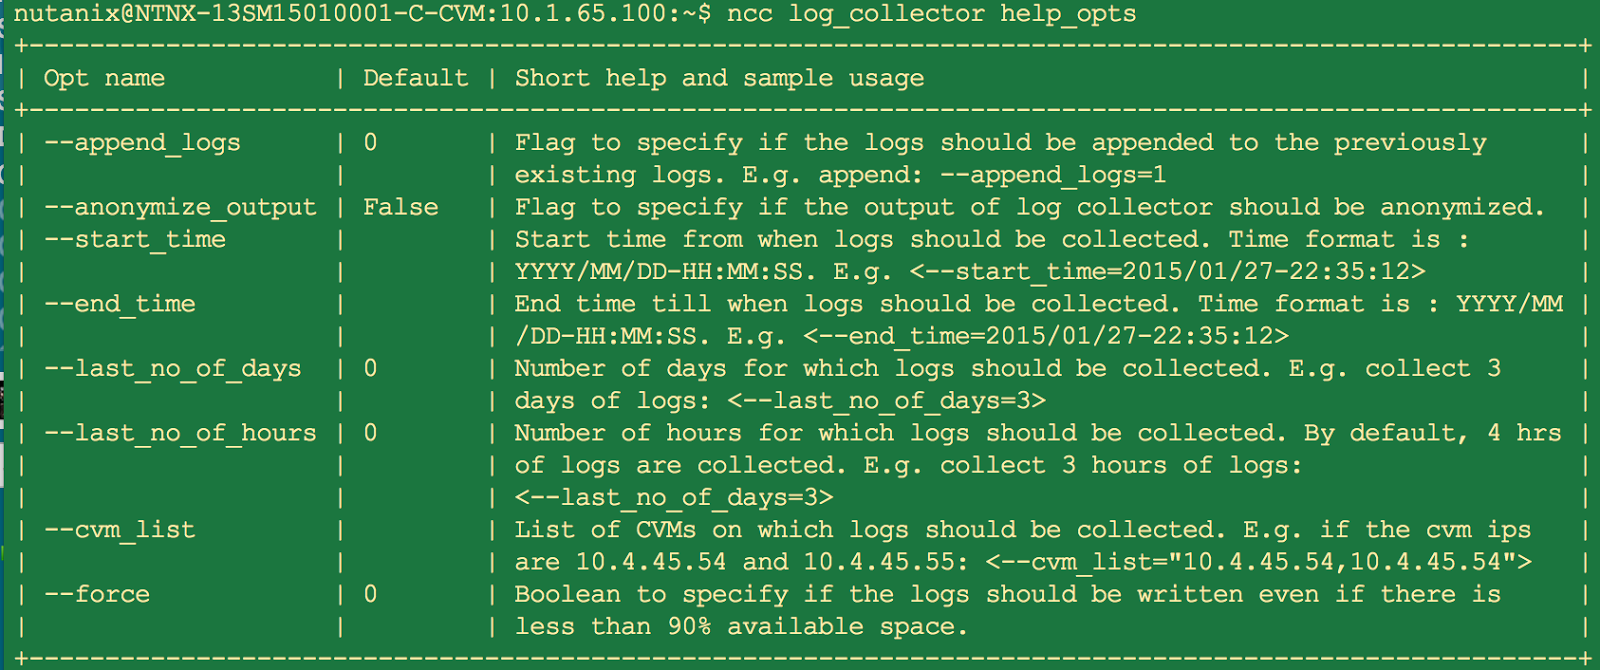
      Running the plugin manually:

      NCC is superset of health check and has more plugins that can be run. NCC can be updated independently of NOS versions. ( note that the certain newer NCC plugins may be applicable only to certain NOS versions). Here are sample of few NCC options.
      ncc health check

       List of Network Checks that can be run ( intrusive checks will affect the performance of the cluster.)
      ncc network_checks
      Sample of running a network_check .

      Future Developments:
      1. Unification of Cluster health, Alerts and Events. 
      2. Impact, Cause and Resolution updated via NCC updates independent of NOS upgrade.
      3. Provide finer Root Cause analysis and more insights into cluster health.
      Here are some of the feedback that we got about  our first version of "cluster health". We will continue to improve the user experience as well as add more checks.


      AFAik, with NX-9000, Nutanix brings Webscale to Flash.

      $
      0
      0
      Before you begin, I strongly recommend you read these fantastic blogs.

      goodbye-dual-controller-arrays-hyperconvergence-meets-all-flash/ - @LukasLundell - explains why flash needs webscale architecture.
      nutanix-unveils-industrys-first-all-flash-hyper-converged-platform - @Nutanix corporate blog.

      All Flash Arrays from the Storage Vendors still have same underlying problems of three tier architecture.

      Here is the main bottleneck caused by dual or single storage controllers in the array. 
      • insufficient processing power so it is unable to keep up with the performance of SSDs 
      IMO, flash exposes the flaws of the three tier SAN architecture. All the goodness of flash is attenuated by three tier SAN architecture.
      It is similar to a fast car (flash drives) being pulled by two horses( storage controllers).
      three tier architecture
      In a similar way, flash will highlight the benefits of Nutanix Architecture. All the goodness of the flash is amplified by the Nutanix Architecture.
      •  distributed storage controllers removing CPU bottleneck
      •  reducing network traffic by localized reads. No need of expensive SAN switch.
      •  Distributed elastic and resource efficient deduplication - store more for less
      • Flexible grow as you go! Future proof your Flash investment! Need more Flash capacity and compute power - just add a node - less initial investment.
      • Flash can take advantage of convergence: hitless upgrade, share nothing architecture, elasticity - add node /remove node, no Single point of Failure, fault domain awareness, tunable resiliency with RAIN - network mirroring) - webscale your flash
      • DR /Metro cluster - protect your VMs. Note: Remote Nutanix cluster can be less expensive hybrid (SSD/HDD) nutanix cluster. - protect your data in the flash for less cost.
      • Nutanix innovates new features at a faster rate than other storage vendors due to distributed architecture and not being in kernel space. Unlike other storage vendors these upgrades are non-disruptive and easier via OneClickUpgrades - feature rich flash
      • At the same time, be hypervisor-agnostic same as legacy AFA. - hypervisor agnostic 


      Flash and Nutanix are made for each other and this convergence will bring out the best, benefiting the customer.
      It is better to have horse power converged within the car rather than having two horses pulling it.( that is just my opinion)


      Finally the specs of NX-9000


      Nutanix Shadow Clones

      $
      0
      0


      Introduction:

      Nutanix shadow clones were introduced in NOS 3.2 to provide a quicker response for the read-only multi-reader vmdks that are accessed from multiple hosts. From NOS 3.5.5 and 4.0.2 onwards, the shadow clones feature isenabled by default.
      Examples of multi-reader vmdks are - linked clone replicasin VMware view/ MCS Master image in Xendesktop.


      Design Info:

      Each VM comprises of vdisk/vmdks. Based on where it was powered on or accessed for the first time, the Controller VM (vdisk_controller) of that host will manage that vdisk. This provides data locality, reduced network traffic and many other benefits.

      With multi-reader vmdks, multiple hosts can access (read) avdisk. Therefore, the read requests from the multiple nodes has to be managed by that one controller VM. NFS server/vdisk controller process (stargate) is capable of handling multiple read requests from different nodes.

      However, it is preferablefor the stargate to be able to detect the multi-reader vmdks automaticallyand create “shadow” cloneon-demand.

      Before the shadow clone feature is enabled:

      • Master replica is owned by one cvm
      • All reads will be redirected to that cvm
      • extent cache of that cvm will be populated
      • Nodata localization on the remote cvm from where the read came.

      After the shadow clone feature is enabled:

      • master replica will be owned by one CVM

      • When a remotelinked-cloneVM access the replica, the shadow clone of that replica vdisk will be created via zero-copy snapshot on-demand and will be owned by the remote CVM.
      • new reads will populate the extent cache and this extent cache will be shared by all vdisks in that cvm. Least recently used(LRU) data will be evicted from the extent cache, if needed.
      • if there is a write to the master replica, then the shadow clones are destroyed.
      • if VMs migrate to another node, either a new shadow clone is created or it will use the existing shadow clone owned by vdisk_controller(CVM) of that node.
      • Logic: if a vdisk has reads from 2 or more nodes AND 
        "no writes for 300 seconds OR number of reads exceeds 100", 
        then shadowclone is created
         This can be changed via gflags ( Note: Do not change gflags without consulting Nutanix support)
      --stargate_nfs_adapter_read_shadow_remote_read_threshold=100
      --stargate_nfs_adapter_read_shadow_threshold_secs=300
       --stargate_nfs_adapter_read_shadow_min_remote_nodes=2

       
      Configuration:
      1. to verify if the shadow clone feature is enabled

      ncli cluster get-params|grep -i shadow

      Shadow Clones Status      : Enabled
      Other way to verify,
      zeus_config_printer |grep shad
      shadow_clones_enabled: true

      1. If it is disabled, enable with ncli cluster edit-params enable-shadow-clones=true
      2. If you have linked clone environment, find the master replica disk’s vdisk_id using the following command

      vdisk_config_printer ( vdisk_config_printer |grep -B 12 shadow|grep -B 10 -A 3 replica)

                vdisk_id: 58810154 <<<<<<
                vdisk_name: "NFS:58810154"
                vdisk_size: 4398046511104
                container_id: 1519
                creation_time_usecs: 1406123698498177
                 vdisk_creator_loc: 4
                 vdisk_creator_loc: 58557595
                 vdisk_creator_loc: 34032844
                 nfs_file_name: "replica-4e5bf2ad-c5d2-4e9d-8a91-f7b17389872e_7-flat.vmdk" <<<<<<
                 may_be_parent: true
                 shadow_read_requests: true  <<<<
      1. Verify that shadow clones are created for vdisk id 58810154. As you see, parent vdisk id is replica vdisk (58810154). shadow clone vdisks are created on the different cvms ( @10, @6 are cvm ids)
      vdisk_config_printer |grep 58810154
      vdisk_name: "NFS:58810154#58810154@10"
      parent_vdisk_id: 58810154
      vdisk_name: "NFS:58810154#58810154@6"
      parent_vdisk_id: 58810154
      vdisk_name: "NFS:58810154#58810154@25525172"
      parent_vdisk_id: 58810154
      vdisk_name: "NFS:58810154#58810154@25525291"
      parent_vdisk_id: 58810154
      1. The properties of the shadow clone ( creates an Immutable shadow). Here i selected for the one on the cvm id 10.
      vdisk_config_printer |grep NFS:58810154#58810154@10 -B 2 -A 12
      vdisk_id: 58825863
      vdisk_name: "NFS:58810154#58810154@10"
      parent_vdisk_id: 58810154
      vdisk_size: 4398046511104
      container_id: 1519
      creation_time_usecs: 1406125098160169
      mutability_state: kImmutableShadow <<<<<<<
      vdisk_creator_loc: 4
      vdisk_creator_loc: 58557595
      vdisk_creator_loc: 34032844
      nfs_file_name: "replica-4e5bf2ad-c5d2-4e9d-8a91-f7b17389872e_7-flat.vmdk"
      generate_vblock_copy: true
      parent_nfs_file_name_hint: "replica-4e5bf2ad-c5d2-4e9d-8a91-f7b17389872e_7-flat.vmdk"

      Performance Gains:
      The shadow clone will improve the bootstorm as well as the reads from a linked clone VM
      Additional Info with regards to performance gains:
      Andre’s Blog - http://myvirtualcloud.net/?p=5979
      Kees Baggerman's Blog - AppVolume Performance improvements

      NCC - The Swiss Army Knife of Nutanix Troubleshooting Tools.

      $
      0
      0


      The Swiss Army knife is a pocket size multi-tool which equips you for everyday challenges.  NCC equips you with multiple Nutanix troubleshooting tools in one package.

      NCC provides multiple utilities (plugins ) for the Nutanix Infrastructure administrator to
      • check the health of Hypervisor, Nutanix Cluster Components, Network and Hardware
      • identify misconfiguration that can cause performance issues.
      • collect the logs for specific time period and components.
      • if needed, ability to execute NCC automatically and email the results at certain configurable time interval.
      NCC is developed by Nutanix Engineering based on inputs provided by support engineers, customers, on-call engineers and solution architects.  NCC helps the Nutanix customer to identify the problem and fix the problem or report it to Nutanix Support. NCC enables faster problem resolution by reducing the time taken to triage an issue.

      When should we run NCC ?
      • after a new install.
      • Before and After any cluster activities - add node, remove node, reconfiguration and an upgrade
      • anytime when you are troubleshooting an issue.


      As mentioned in the cluster health blog, NCC is the collector agent for cluster health.

      Roadmap for NCC 1.4( Feb 2015) and beyond:
      • infrastructure for alert ( ability to configure email, frequency of the checks) - (Update : NOS 4.1.3/ NCC 2.0 - Jun 2015)
      • ability to dynamically add new checks to the cluster health or alert framework after the NCC upgrade. 
      • Run NCC from the Prism UI and upload the log collector output to Nutanix FTP site.
      • Link to the KB that provides details for the specific failures. ( Fix-it-yourself) - ( Update: NOS 4.1.x/NCC 1.4.1)
      • Re-run only the failed tests.
      • Link pre-upgrade checks to the latest NCC checks. 


      a. Download and upgrade NCC to 1.3.1 
      http://portal.nutanix.com -> Downloads -> Tools and Firmware

      NCC 1.3.1(latest version as of Jan27 '2015) will be the default version bundled with the NOS 4.1.1.
      1. Upgrading NCC from CLI:
      • Jeromes-Macbook:~ jerome$ scp Downloads/nutanix-ncc-1.3.1-latest-installer.sh nutanix@10.1.65.100:
      • Login to CVM and run "chmod u+x nutanix-ncc-1.3.1-latest-installer.sh;./nutanix-ncc-1.3.1-latest-installer.sh
      2. NCC Upgrade UI screenshot: (NCC 1.4 can be upgraded via UI from NOS 4.1.1.  )

      b. Executing NCC healthchecks:

      1. ncc health_checks - shows the list of health checks


      2. Execute "ncc health_checks run_all" and monitor for messages other than PASS.

      3. List of NCC Status


      4. Results of a NCC check run on a lab cluster


      5. Displaying and analyzing the failed tests.


      FAILUREs are due to sub-optimal CVM memory and network errors. So to fix the issue
      - increase CVM memory to 16G or more. (KB: 1513 -https://portal.nutanix.com/#/page/kbs/details?targetId=kA0600000008djKCAQ )
      - check the network (rx_missed_errors -- check for network port flaps, network driver issues- KB 1679 and KB 1381)

      c. Log Collector Feature of NCC: ( similar to show tech_support of Cisco or vm-support of VMware)

      NCC Log collector collects the logs from all the CVMs in parallel.

      1. Execute ncc log_collector to find the list of logs that will be collected.


      2. To collect all the logs for last 4 hours -  ncc log_collector run_all
      For example: stargate.INFO will have the time period when it is collected:
      ****Log Collector Start time = 2015/01/27-09:19:15 End time = 2015/01/27-13:19:15 ****

      3. to anonymize ( ip address/cluster name/username)  the logs 
      "ncc log_collector --anonymize_output=true  run_all"
      The directory listing within the tar bundle:
      nutanix@NTNX-13SM15010001-C-CVM::~/data/log_collector/NCC-logs-2015-01-27-640-1422393524$ ls
      cluster_config  xx.yy.64.165-logs  xx.yy.65.100-logs  xx.yy.65.98-logs
      command.txt     xx.yy.64.166-logs  xx.yy.65.101-logs  xx.yy.65.99-logs

      4. To collect logs only from the component stargate  "ncc log_collector cvm_logs --component_list=stargate"

      Additional Options:


      5. To collect logs only from one CVM "ncc log_collector --cvm_list=10.1.65.100 alerts"

      6. More options and filters:


      d. Auto-run of NCC healthchecks and email of the results

      Verify if Email alert is enabled:
      nutanix@NTNX-13SM15010001-C-CVM:~$ ncli alert get-alert-config
          Alert Email Status        : Enabled
          Send Email Digest         : true
          Enable Default Nutanix... : true
          Default Nutanix Email     : al@nutanix.com
          Email Contacts            : j@nutanix.com
          SMTP Tunnel Status        : success
          Service Center            : n.nutanix.net
          Tunnel Connected Since    : Wed Jan 21 13:58:03 PST 2015
      Enable auto-run of NCC
      ncc --set_email_frequency=24
      Verify the config:

      ncc --show_email_config     
      [ info ] NCC is set to send email every 24 hrs.
      [ info ] NCC email has not been sent after last configuration.
      [ info ] NCC email configuration was last set at 2015-01-27 13:47:32.956196.


      Sample Email:


      Foundation: Then, Now and Beyond

      $
      0
      0

      In creating a world class product, the challenge is always to develop something that is flexible,useful and simple. Many times, simplicity is lost at the expense of greater flexibility or flexibility is lost when a product becomes overly simple.


      During the development process at Nutanix, two questions are always asked: “How do we build a solution that is simple yet flexible at the same time? How do we make the datacenter invisible? How do we help our customers to spend more time with their loved ones than being in the datacenter ?
      The Nutanix datacenter solution is easy to operate, install, configure, and troubleshoot thanks to features such as Easy and Non-Disruptive upgrades, Foundation, and Cluster Health.
      Highlighted below is the evolution of one of our most exciting features, the Nutanix Foundation installer tool.


      Then
      Before Foundation, the Nutanix factory had a repository of scripts that allowed them to install, test, and ship the blocks to the customers.  The scripts had limited options for network configurations, hypervisor, and Nutanix OS versions. Our customers told us they needed increased flexibility to install the hypervisor of their choice, a hypervisor version of their preference, and the Nutanix OS with the networking configuration that best suits their datacenter at the time of installation, not at the time of ordering.

      While we were developing this tool, one of Nutanix hypervisor partner decided to throw a curve ball at us, forced us not to ship their hypervisor from Nutanix factory, even if the customer wanted their hypervisor. They considered us a competitor though we were enabling their bare hypervisor to move up a few layers and provide storage as well.

      This made us more deterministic to provide the flexibility of changing the hypervisor at the time of installation to our field, partners and customer. This tool will eventually help our customers to change the hypervisors at anytime on a running cluster.


      Vision:Multi-Hypervisor Cluster
      Now
      To meet these customer needs, the Nutanix Foundation installer tool was created. It was developed with the aim of providing an uncompromisingly simple factory installer that is both flexible and can be used reliably in the customer datacenter.
      Foundation 2.1 allows the customer/partner to configure the network parameters, install any hypervisor and NOS version of their choice, create the cluster, and run their production workload within a few hours of receiving the Nutanix block.
      So far, customer feedback has been fantastic.


      Screen Shot 2015-05-13 at 10.16.15 AM.png


      In the short time that Foundation has been available, the tool has quickly evolved to meet new customer needs.


      Screen Shot 2015-05-14 at 12.37.58 PM.png


      Beyond


      We strive to keep Foundation uncompromisingly simple and still extend the features without becoming a “featuritis - feature nightmare” by constantly reviewing it with our UX team.

      Here are a few features our team is currently evaluating, that will use Foundation3.0 APIs:
      • Seamless expansion of clusters
      • Faster replacement of boot drives
      • Network aware cluster installs
      • Consistent and easy installation experience with mixed hypervisors in the same cluster.

      We will release more details on each of these features and how we accomplished it using Foundation 3.0 within two to three months.

      Note: First version of this blog appeared in .Nutanix Community Blog


      Nutanix Resiliency: Invisible Failure (Part I:Introduction and Disk Resiliency Details.)

      $
      0
      0
      .


      Resiliency is the ability of a server, network, storage system,to recover quickly and continue operating even when there has been an equipment failure, or other disruption.

      Invisible Infrastructure should have the ability to fix the failure without any disruption to the end user or the application.

      In Nutanix, every component is designed to be resilient to the failures. As we all know,that the  hardware will fail eventually or the certain part of software will have bugs, it is the job of the software to build resiliency when there is a failure.

      Nutanix XCP platform is inherently resilient to failures due to the intelligence built into the distributed software. Nutanix XCP administrator can configure additional resiliency on a container/datastore level, if resiliency needs to cover the multiple point failure. However, the self healing capability of Nutanix XCP platform reduces the need for configuring higher level of resiliency than the default.

      In this blog, let me introduce to the different types of resiliency available in our system.

      1. Hardware Resiliency:

      a. Disk Resiliency
      b. Node Resiliency
      c. Block/Rack Resiliency
      d. Cluster Resiliency/Data Center Resiliency
      2. Software Resiliency 
      a. Quarantining the non-optimal node
      b. Auto-migration of Software services to a different node (Cassandra Forwarding/Zookeeper migration)
      b. Fail Fast Concept
      c. No strict Leadership
      d. Share Nothing Architecture.
      e. Fault tolerance - FT-1 and FT-2


      a. Disk Resiliency:
      Nutanix Architecture
      If the Nutanix cluster is configured for the tolerance of one failure (FT=1*) at a single point of time,  when a block of data is written, the second copy of the data will be stored on a disk in another node.

      If any disk fails, the data on that disk will be under-replicated, but all the blocks of the data of the failed disk can be accessed from the other nodes in the cluster.  Nutanix self healing process running on all the nodes in the cluster will re-replicate the data in the background.

      Data Resiliency Status

      Nutanix Controller VM data is on the SSD and it is mirrored to the second SSD on the same node.In the event of an SSD failure, Nutanix CVM will continue to run without any disruption.

      Nutanix Cluster monitors the disks proactively through S.M.A.R.T utility, so if the value of any attribute indicates any potential failure, the cluster will copy the data from the disk to other nodes/disks in the cluster and mark the disk offline.


      After replacing the disk physically, Nutanix UI will guide the customer to re-add the disk back to the cluster.
      UI: Adding the replaced disk to the cluster


      *FT=1 or FT=2 is configurable.  More details in http://nutanix.blogspot.com/2014/06/nutanix-40-feature-increased-resiliency.html


      Disk offline logic: (hades process)


      On a serious note, let us see if The Wolverine or DP has the better self-healing powers?


      Viewing all 26 articles
      Browse latest View live